



I don’t remember hitting Print Screen for this one when I was making Vikstone’s Classic Expedition. That’s the thing about some of your favorite screenshots. You’re in the moment, reacting to something the game just threw at you, and your thumb finds the key before your brain catches up.
Most of my best shots were accidents, and they taught me what I’d been unconsciously going for the whole time.
This was in 2008. I was 18 years old, playing through Wrath of the Lich King on the Terokkar server with my Night Elf Warrior, Vikstone. I didn’t have photo mode or free camera mode, and I started the game like anybody else at level 70. I only had the Print Screen key and whatever was on my screen. Most storyline quests can only be completed once, which meant most of these shots were one-take.
By the time I finished documenting Northrend’s storyline quests in July 2009, I had about 22,000 raw screenshots in a single master folder. I went through all of them, sorted them, and split each set of screenshots into separate folders for each quest. I had to decide which ones were keepers and which ones had to get pruned.
About 10,500 made the cut.
Those thousands of rejected shots taught me a lot about in-game photography. When you look at a screenshot and ask yourself why it doesn’t work, you start to see patterns. It could be bad timing, cluttered frames, or crap lighting. A composition that almost worked but didn’t because the camera was two degrees off – that happened a lot. Once you see it 500 times, you start developing an instinct for what makes a shot land.
Everything in this guide comes from that process. I’m going to show you what I learned by doing it wrong, with a character I couldn’t replay for these specific moments from OG Wrath that I couldn’t recreate.
This was before WoW had anything resembling a photo mode. There was no Narcissus addon, DynamicCam, or ActionCam console commands. The tools have gotten better since then, and I’ll cover the modern ones later in this guide. Composition and timing matter, and these fundamentals are worth learning to improve general photography skills before you use addons. These principles include leading lines, negative space, the decisive moment, and others.
The biggest advantage you can give yourself as a game photographer is seeing the frame in the mind’s eye before pressing the print screen button.
Let’s start there.
Composition is the difference between “I captured that boss fight” and “this image tells a story.” These are patterns that photographers have been using for over a century, and they work just as well inside a game engine as they do through a camera lens.
I’m going to show each concept with a specific Vikstone screenshot, because theory without examples is just trivia.
Rule of Thirds
Divide your screen into a 3×3 grid. Place your subject along the lines or at the intersections instead of dead center.
In WoW, this usually means positioning your character off to one side and letting the environment fill the rest of the frame. It works because the human eye naturally wanders to those intersection points. A centered subject feels static, but an off-center subject feels like it’s part of a larger scene.

The Rule of Thirds: it’s not actually a strict rule. It’s a starting point.
Sometimes, centering your subject is the right call. Boss confrontations, symmetrical architecture, getting shots of major locations like Dalaran or Wyrmrest Temple. If the scene is inherently symmetrical, forcing it off-center looks wrong. The skill is knowing when to follow the grid and when to ignore it.
Wes Anderson built an entire filmmaking career around centered symmetry. Film schools actually teach against it because it can feel stagey, but Anderson makes it work by committing to it fully. The lesson is the same: centering your subject has to look intentional. If it looks like you just didn’t bother to compose, it reads as lazy instead of bold.
WoW’s skies are often more interesting than its ground planes, by the way. Blizzard’s skybox artists were doing good work in WotLK. So when you’re setting up your thirds, think about where you place the horizon. Low horizon gives you more sky. High horizon grounds the shot and emphasizes terrain.
Most players default to horizon in the middle, which is usually the least interesting option.
Leading Lines
Look at any well-designed zone in WoW and you’ll see lines everywhere, such as roads, rivers, bridge railings, the edges of walls, and beams of light in places like Grizzly Hills. These lines naturally pull the viewer’s eye through the image, and if you position yourself right, you can use them to direct attention exactly where you want it.

The roads in Northrend are especially good for this. Blizzard dropped paths that curve toward quest hubs and funnel you toward zone transitions. They frame the landscape as you travel. If you’re running down a road and the composition looks awesome, there’s a reason. The designers put the line there on purpose.
Photographers split these into converging lines, where two edges narrow toward a single vanishing point like a road disappearing into distance, and curved lines like rivers and winding paths that pull the eye more slowly. Converging lines create urgency. Curves invite exploration.

Advanced application: leading lines work best when they point toward something the viewer should care about. For example, this can be a road leading to a quest objective or a river flowing toward a waterfall. Bridge railings can frame a character standing at the center. If the line leads to nothing in particular, the eye follows it and then gets lost.
If Vikstone’s gaze, the NPC’s weapon, and the road all lead to the same spot, the shot has one destination and it works. If they point three different ways, the eye bounces between them and gives up. The Westfall shot further down this page, where Vikstone points during the Black Knight quest trek, works for exactly this reason. A /point emote is the most literal arrow the game gives you.
Subtractive Composition
Great composition is less about what you include and more about what you remove.
Imagine you’re at a bar trying to have a conversation, but there’s a band playing too loud, three TVs going, and someone yelling their drink order. The conversation might be great, but you can’t hear it over the damn noise. A cluttered screenshot is the same problem. Your subject might be perfect, but the floating combat text, nameplates, chat frame, minimap, and two random players running through the background are drowning it out.
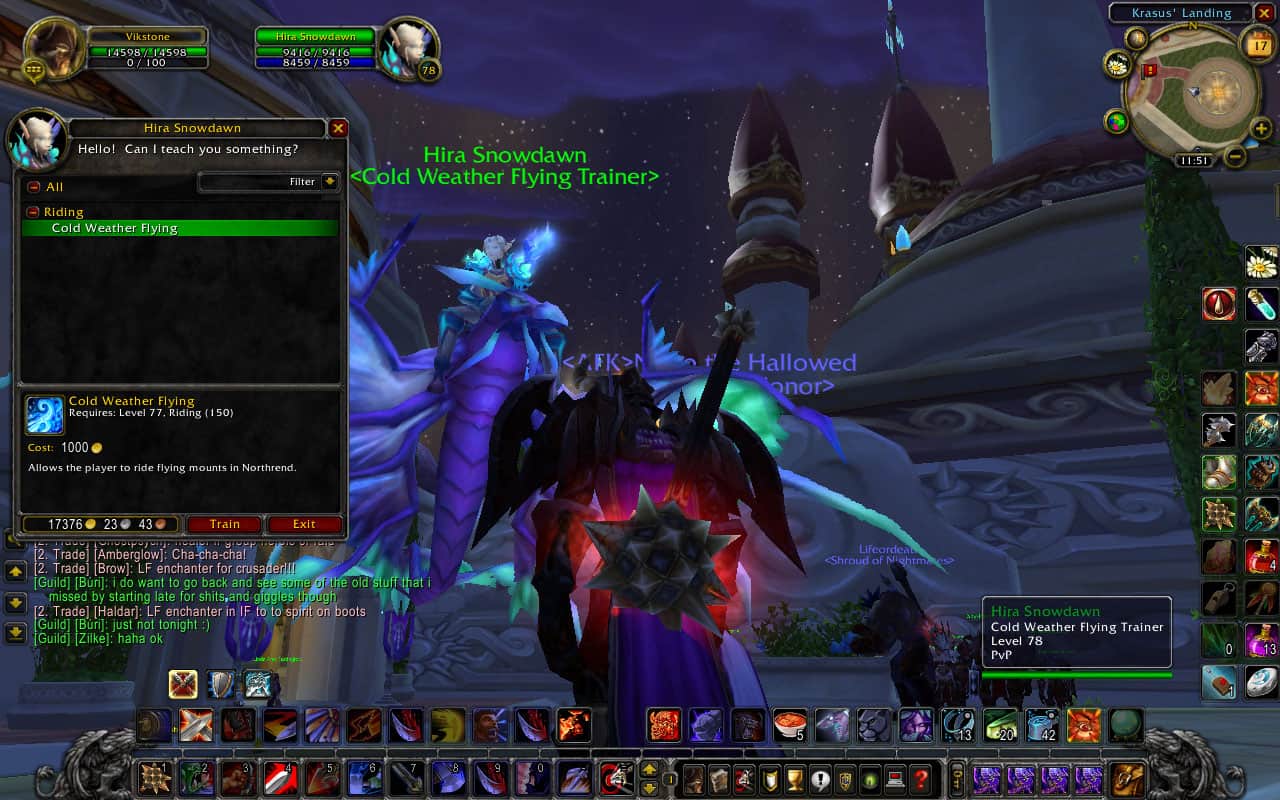
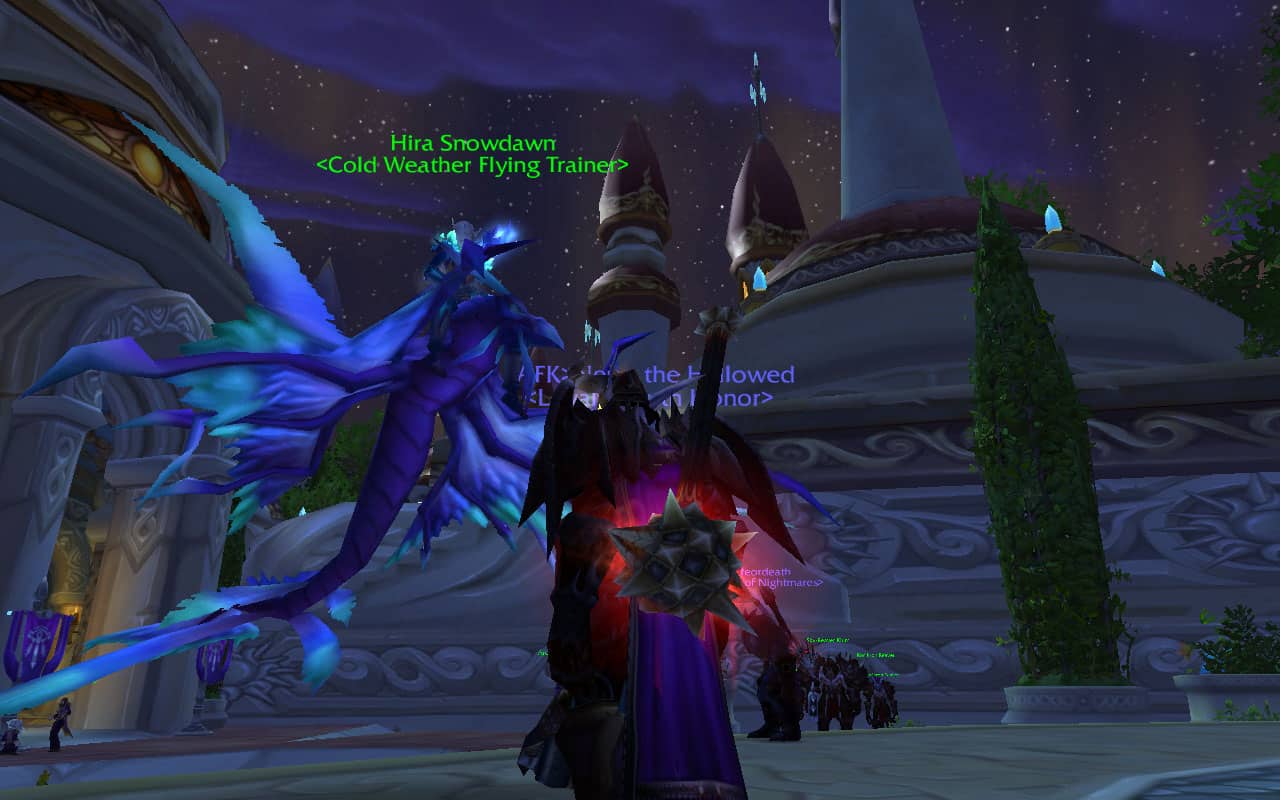
The above is not a 1:1 comparison but shows the difference in clarity. In this case, the UI can still be helpful for showing Hira Snowdawn (Cold Weather Flying trainer) and her location in a busy city like Dalaran.
In WoW, subtractive composition starts with Alt+Z to hide the entire UI. Then you toggle nameplates off (V for enemy plates, Shift+V for friendly, Ctrl + V for ALL nameplates), clear your floating combat text, and position your camera to crop out other players when you can. You may need to wait for mobs to clear an area before you take a landscape shot. None of this is complicated, just a checklist you run before you press Print Screen.
This is why Alt+Z is valuable. In addition to “hiding the UI,” you’re also removing visual noise.
You can crop in tight on a character’s face instead of trying to capture the entire battlefield. A shot with one strong element is almost always better than a shot with five competing elements.
Negative Space and Breathing Room
WoW’s massive skyboxes are one of your greatest tools and can work as compositional elements. Negative space is the empty area around your subject. It’s the sky, the open water, the blank snowfield.

A character standing alone against Icecrown’s sky feels different from a character surrounded by a busy quest hub. The emptiness isn’t wasted space. It’s telling you something about that character’s situation, and you can use the world environment to set the tone.
If you’re shooting in zones like Dragonblight or Storm Peaks, you have enormous sky and terrain to work with. Let it breathe and don’t feel like you need to fill every corner of the frame with stuff. Some of my strongest Northrend shots are the ones where Vikstone occupies maybe 15% of the image and the rest is sky or fog.
This is how real photographers communicate scale in a single image without any context. Examples include a climber on a rock face or a boat on open water. The subject is small on purpose and the emptiness around them is the point.
If your character is facing right, leave more room in front of him than behind his head. If the Stormsaber is leaping left, the open air on the left side of the frame is where the leap is going. This is called lead room, and it’s why the Krolmir shot above works, too.
Depth and Layering
Even inside a game engine, you can create the illusion of depth by thinking in layers: foreground, midground, background. In this way, a flat image feels three-dimensional.
The game uses distance fog and atmospheric haze to simulate depth, and different zones have different amounts of it. Dragonblight’s fog is thick and cold. Storm Peaks has clouds cutting through mountain peaks. Howling Fjord layers mist over water. These are aesthetic choices by the art team AND depth cues you can use.

One flaw in this shot, and it’s mine: the background is cut short. Sholazar’s canopy runs much higher than this, but UI clutter sat in the top of the original frame, and cropping it out took the treeline with it. The fix was available that day for free. All I had to do was swivel the camera up before pressing Print Screen, and the clutter never enters the frame at all. Cropping can only remove. It saved this shot and it cost this shot in the same cut.

When you’re setting up a shot, look for something to put in the foreground. Like a rock, a tree, the edge of a cliff. It gives the viewer an anchor point and makes the rest of the scene feel further away. Without that foreground element, even the most dramatic backdrop can feel flat.
This is known as “near-far composition” in landscape photography. Put a rock or a wildflower inches from the lens to anchor the foreground, then let the eye travel to the mountains behind it.
Focal Weight and Visual Hierarchy
Where does your eye go first when you look at an image?
That’s focal weight. Bright objects pull attention. Warm colors pull attention. High-contrast edges pull attention. Faces pull attention. The human brain is wired to prioritize these things, and WoW’s art design uses all of them.

WoW has its own focal anchors that compete with yours. Nameplates, quest markers, glowing NPCs, exclamation marks over heads. If you’re trying to compose a dramatic landscape and there’s a bright yellow question mark over some quest giver’s head in the corner, that question mark is going to pull the viewer’s eye whether you want it to or not.
This is another reason to hide the UI for important shots.
Most of my shots in Vikstone’s Classic Expedition kept these markers and NPC names because it is meant to be authentic and serve as a guide to leveling through the story. Without NPC names and references to map locations, it wouldn’t make sense to the newbie player.
Beyond UI elements, it means being intentional about what’s brightest and most visually prominent in your frame. If your subject is a character in dark armor standing in front of a glowing magical effect, the spell is the focal point, not the character. That might be what you want. But if it’s not, you need to reposition.
Dynamic Tension
Diagonal lines and tilted implied movement create energy in an image. Horizontal shots feel calm. Vertical shots feel tall. But diagonals feel active, unstable, alive.
Action shots naturally produce this, such as a character mid-swing, a spell arcing through the air, or a mount banking into a turn. The diagonal motion creates a line of energy that makes the image feel like it was captured during something happening, not posed.

There are two schools of thought here.
The “spray and pray” approach says: mash Print Screen as fast as you can during combat and sort through the results later. You’ll get more frames to choose from, but most of them will be throwaways, and on older hardware, the rapid captures could tank your frame rate. My hardware was bad even by WoW’s standards, and WoW famously ran on a toaster.
The “decisive moment” approach says: watch, wait, and press once at the right time. You keep fewer shots, but the hit rate is higher.
I used the second approach for most of Vikstone’s journey. It produces better results even though you end up with fewer keepers. The act of watching for the right moment trains your eye, and that training carries over into everything else. You start seeing compositions before they happen and can predict what shots you can get with specific abilities. In my case, a Rend attack will give a nice blood-splatter effect.
A Charge attack will easily give a “diagonal motion” shot.
The spray-and-pray method problem I had in 2008 is solved now. You can record video and extract frames: run OBS (or NVIDIA’s overlay) during the encounter, then scrub the footage afterward and export the exact peak frame. It’s the decisive moment with a rewind button.
The Num Lock Auto-Run Technique
This one is simple and it changed everything for me.
Hit Num Lock. Your character runs forward automatically. Both your hands are now free. One goes to the mouse for camera control. The other hovers over Print Screen.
Now you can swivel the camera while your character runs through a zone, and the resulting shots have a natural sense of speed and direction. The character is moving across the frame at an angle, the background is shifting, and the whole image feels alive in a way that a standing-still shot never does.

This is where dynamic tension from the composition section shows up, with the diagonal motion line creating energy. The viewer’s eye follows your character’s movement, and the shot tells a micro-story: this character is on their way to something. It’s even better on a flying mount, and you can swivel the camera down to look at the landscape below without having to point the mount down towards the ground.
Advanced version for Warriors: throw Heroic Throw mid-run. Num Lock keeps you moving, you fire off the ability, and you capture the projectile in the air while your character is in full stride. It looks like an action movie still. It takes some practice to time the Print Screen while managing the camera angle and the ability cooldown, but once you get the feel for it, these become some of the most cinematic shots in your archive.
Character Posing
Sometimes you want a composed, deliberate shot of your character looking a certain way in a certain place. WoW gives you more posing tools than most players realize.
Z key draws or sheathes your weapons. Hit Z before a fight and your character stands with his weapon ready, looking like he’s about to engage. That battle-ready stance reads completely differently from the relaxed idle animation. It communicates intent.
Emotes give you specific poses. /kneel for reverence or defeat. /salute for respect. /point for directing attention. Put your character in the right spot, trigger the emote, and capture it before the animation loops back to idle.
Idle animation timing is subtler. Every class and race combination has an idle cycle, a sequence of small movements your character does when you’re not touching anything. Some frames in that cycle look better than others. If you watch your character’s idle for ten seconds, you’ll notice there’s usually one position that looks natural and composed. That’s your frame.
An example would be to take the shot after combat ends, with your weapon drawn idly at your side (unsheathed).

Combat stance trick: start a fight for the aggressive combat posture, then capture before the actual engagement gets messy. Your character shifts into a ready stance the moment combat initiates. That first half-second, before abilities start flying and damage numbers fill the screen, is a sweet spot for dramatic character shots.
The Alcohol Blur Effect
This is one of my favorite tricks and it’s completely built into the game. When your character drinks alcohol in WoW, the screen gets a soft glow. A slight blur, a warmth to the colors, a dreamlike quality to the whole image.
Two drinks is the sweet spot (TIPSY MODE). Enough for the effect, not so much that the blur wrecks image clarity. I call it the two-drink rule. Unfortunately, I got carried away at times, as you can see throughout the guide, and some pictures got so blurry (after 3+ drinks) that some fine details were lost. When I had to do extended shoots from my Netherwing drake (upon which you can’t drink), I had Vikstone consume 3 drinks beforehand, often staggered, so I wouldn’t lose the effect all at once.
I didn’t have the luxury of high-end graphics on the outdated laptop I used years ago as a broke college student. The alcohol blur was partly a creative choice and partly a workaround. It smoothed out the rough edges of low graphics settings without crashing the client. Vikstone’s drink of choice was Caraway Burnwine, a Nordic strong schnapps. He consumed it 1,098 times across the journey.
Instant Sobriety: If you ever need to take the edge off the screen effect, you can buy and drink Major’s Frothy Coffee, sold by cooking vendors in Kul Tiras and Zandalar (BfA, retail only). It sobers you up a bit rather than fully, so heavy drinkers may need more than one.

When to use it: atmospheric establishing shots, emotional moments, transitions between quest hubs, sunset/sunrise captures, any scene where you want the image to feel slightly softened and nostalgic.
When to skip it: action shots where you need sharp detail, boss fights where visual chaos is already high, any situation where the blur competes with something the viewer needs to see clearly. The effect is a tool, not a default. Using it on every shot kills its impact.
What the blur really does, in photography terms, is simulate a shallow depth of field. Real cameras can blur the background to isolate a subject. WoW’s engine can’t do that natively. But the alcohol effect creates a similar feeling, a slight softness that makes the whole image feel less like a digital render and more like something captured through a lens, or painted. It’s not a perfect simulation, but the mood it creates is real.
They call the quality of that blur “bokeh,” from the Japanese word for haze. WoW’s alcohol effect is technically a bloom filter that softens the entire image but it hits a similar emotional note: the world goes slightly dreamy, and the hard edges of the game engine disappear.
There’s a console command that controls the game’s glow directly. /console ffxGlow is an on/off switch: 1 is the default bloom you see every day, and 0 strips it entirely, leaving everything sharp and flat. Toggle it off for a shot and you’ll suddenly notice how much work that glow was doing. Flip between the two and pick whichever fits the mood of your shot.
For players who want even sharper detail, /console set resampleAlwaysSharpen 1 adds a post-processing sharpening filter that makes armor textures and weapon edges pop. Fair warning, it can look overcooked on some hardware.
Modern WoW also has proper screenshot tools now. Narcissus is the community-built photo mode I wish existed in 2008, with adjustable lighting, depth-of-field blur, and character posing. The S.E.L.F.I.E. Camera toy adds native filters.
Neither of these existed during Vikstone’s journey, but they’re worth knowing about if you’re shooting today. More on that in the Addon section near the end of this page.
Warrior Combat Photography
I played only with Vikstone (a Warrior) during my WoW career and my screenshots reflect it. But the principles here apply to any class if you learn which of your abilities have the most photogenic animations.
For Warriors, the money shots are:
Retaliation + Bladestorm. Stack these and the visual result is maximum combat intensity. Vikstone becomes a blur of steel with multiple weapon arcs visible simultaneously. The timing window is narrow because these abilities resolve fast, but when you catch it, you get shots that look pretty badass. Critical hits proc Deep Wounds, which leads to bleed animations.
Battle Shout and Intimidating Shout. These create dramatic poses. The character throws their arms wide, the camera shakes slightly, and for a brief instant your Warrior looks like they’re commanding the battlefield, or mourning a comrade. Hit Print Screen during the shout animation, not after.
Composition tells you where to place things. Timing tells you when to capture. But lighting and atmosphere tell you how the shot is going to feel. Two screenshots of the same location, taken at different times in WoW’s day cycle, can communicate completely different emotions. One feels warm and safe. The other feels cold and dangerous. Nothing changed except the lighting.
WoW’s Lighting Cycle
WoW runs a day/night cycle. It’s not as dramatic as some games, but it’s there, and it creates distinct color temperatures throughout the in-game day. The golden hour equivalents exist in WoW. There are periods where the light goes warm and low, casting longer shadows and turning stone surfaces orange. If you pay attention to when these happen in-game, you can plan your screenshots around them the same way a landscape photographer plans around sunrise and sunset.
Night photography is a different challenge. Subjects get dark, but spell effects and glowing armor pieces become more prominent. If your character has a glowing weapon enchant, nighttime makes it the brightest thing in the frame, which can work for you or against you depending on what you’re going for.

Some areas have fixed or semi-fixed lighting. Instances, certain indoor spaces, and phased zones don’t follow the outdoor cycle. This is actually useful because it means you can always predict what the lighting will look like in those locations. You don’t have to guess or wait for the right time of day.
Color Temperature as Mood
Blizzard’s art team used color temperature as a storytelling tool across Northrend’s zones, and you can lean into that or push against it in your screenshots.
Dragonblight is cold, with blues, grays, and muted whites. Your screenshots there will naturally carry that mood if you let the zone’s palette do the work.
Grizzly Hills is warm, with golds, greens, and autumn oranges. The contrast is intentional, and your screenshots should reflect that warmth. The zone even has its own theme built around a nyckelharpa, a Swedish keyed fiddle, that anyone who leveled through it can still hum.
Zul’Drak is green-tinged, corrupted, oppressive. It reminded me of the later scenes of Apocalypse Now, when Willard pushes upriver, and civilization falls apart around him.

If the zone already communicates a mood through color, work with it. Don’t fight the palette. A warm, sunny screenshot in Icecrown feels wrong because Icecrown isn’t warm and sunny. The zone’s design is telling a story, so let your shots tell the same one.
Weather as Storytelling
Snowfall in Storm Peaks, fog rolling through Howling Fjord, rain effects in Grizzly Hills. Weather adds atmospheric depth to your shots, literally. It creates layers of visual information between your camera and your subject, and those layers make the image feel more three-dimensional.

Some weather in WoW is scripted. Certain quest phases trigger specific weather conditions, and knowing when those happen gives you opportunities that other players miss because they’re focused on the quest objective, not the atmosphere around it. I was lucky to capture these effects during some of the most important WotLK quest cutscenes, such as the aftermath of Wrathgate and the Crusader Bridenbrad quest chain.
Keep your eyes open during phased content. The game is sometimes handing you a perfect photography setup while asking you to go kill ten things.

Location Scouting
The best photographers visit the location beforehand, not simply shoot and hope for the best. They study the light at different times. They identify the angles that work and the ones that don’t. In WoW, this is fast and easy, especially with a flying mount. Before you start questing in a new zone, take five minutes to fly around. Look at the landmarks from different angles. Note where the dramatic overlooks are, where the light hits best, where the environment creates natural frames and leading lines.
When I arrived at a quest location on foot, I already knew what the area looked like from above and from multiple ground angles. I knew which direction to face the camera. I knew where the best background would be. The actual quest photography went faster because the scouting was already done (I was documenting a Northrend atlas).
I didn’t do these in the early zones and the quality of my shots suffered for it. But the point was that it was a learning process. While this made the second half of the process much longer, it was well worth it.

| Zone | Palette | Mood It Hands You | Shoot It For |
|---|---|---|---|
| Borean Tundra | Muted browns, cold blue coastlines | Frontier desolation | Industrial shapes, coastal contrast |
| Howling Fjord | Deep greens, gray cliffs, sea mist | Norse melancholy | Fog layering, vertical scale |
| Dragonblight | Blues, grays, muted whites | Cold, grief, aftermath | Negative space, lone figures |
| Grizzly Hills | Golds, greens, autumn oranges | Warmth and homesickness | Golden-hour light, rivers, timber |
| Zul’Drak | Sickly greens, stone grays | Corruption, decline | Oppressive framing, ruins |
| Sholazar Basin | Saturated jungle greens, crystal accents | Impossible oasis | Color contrast against every neighbor |
| Storm Peaks | White, slate, aurora violet | Mythic altitude | Sky drama, snow weather, scale |
| Icecrown | Saronite black, glacial blue | Dread, finality | Silhouettes, architecture, the Citadel |
When I went through the archive, the rejected shots fell into a few consistent categories:
Wrong timing. The animation was a frame early or a frame late. Close, but not the peak of the action.
Cluttered composition. This includes random players in the background, nameplates left on, combat text filling the frame, UI elements I forgot to hide. For my leveling guide, I kept some of these anyway because documentary authenticity mattered more than making it look perfect. When I was choosing between two shots of the same moment, the cleaner frame almost always won. I also kept floating damage text active in many scenes, to more accurately show what the leveling journey was like.

Bad lighting. Shot taken at the wrong time in WoW’s day cycle, or in a spot where the environmental lighting washed out the subject.
Redundant duplicates. Three shots of the same moment, where one is clearly the strongest. The other two aren’t bad, but they’re not the best version of that moment, and keeping all three weakens the collection as a whole.
Once you identify these patterns in your own work, you start avoiding them before you press Print Screen. My early Borean Tundra shots had a much higher rejection rate than my Icecrown shots, not because Icecrown is more photogenic (though it is), but because by the time I reached Icecrown, I’d already learned from thousands of mistakes. I also learned to take more shots in the later zones and that gave me more options to pick the best ones.
Post-Processing: When to Edit and When to Preserve
Every shot on this site from Vikstone’s WotLK run is original except for occasional cropping. I didn’t color correct, adjust contrast, or run any filters. The goal of this project was to preserve how WotLK looked in 2008 and 2009, on my hardware, through my old client, as I played it. Editing the shots to look “better” would defeat the point. That said, cropping is fair game.
Cropping is just subtractive composition applied after the fact. If a shot is strong but would be stronger with the left 20% removed, I’ll crop it. You’re not adding anything that wasn’t there. You’re just tightening the frame, and some of my favorite shots had item windows/UI stuff off to the side that didn’t need to be there (unless it could help the leveling process). If you need to show where an important item is located, it’s worth keeping those details in, including NPC names and quest windows.
For readers who want to go further with their own screenshots, there’s nothing wrong with more involved editing. Color correction, contrast adjustment, even compositing if that’s your thing. Tools like Photopea (free, browser-based) and GIMP can handle all of it. Just be aware that heavy processing changes the character of a game screenshot. There’s a line where the image stops looking like WoW and starts looking like a digital painting. Where that line falls is up to you.
Over-processing is the most common mistake I see in game photography communities. The original image can have more character with flaws. The edited version has filters and looks obviously doctored. Sometimes the raw capture, with all its imperfections, is the stronger photograph.
Sometimes you get lucky.


Some enemies just take a long time to fall.

Click Z to sheathe/unsheathe your weapon
Click Num-Lock while heading in a direction, then swivel around with the left mouse button to maintain the frame of the shot while firing. The Going Bearback quest was renamed to Bearly Hanging On in WotLK Classic to be more family-friendly.


Rend and Deep Wounds (triggered by critical strikes) gives a bleed animation effect that Warriors can take advantage of for these shots.
In the quest The Solution Solution, you lure Frostbrood Destroyers with a Bait Dummy, causing them to explode.
If you’re fast enough, you can fly on your mount and get above them before they explode (use Alt + Z to hide interface).


Blowing up Abominations in Generosity Abounds.
Vikstone got a taste of his own medicine.

A gnome mage avenges Vikstone after he gets wtfpwned by a bunch of mobs in Icecrown.

Are you not entertained? (Click Z to sheathe your weapon/gear but time it)


Up close and personal, using the Netherdrake cam.

How to Slay Your Dragon was an interesting quest, formerly named Thrusting Hodir’s Spear. I was able to capture Bonvitch in a guest appearance.
The Netherdrake cam allowed me to shoot the scene while flying with Bonvitch.

The perks of a shield, allowing Spell Reflection, a core defensive ability for Protection Warriors.


Run in one direction, click Num-Lock to auto-run, swivel the screen with the left mouse button, and throw it for a shot like this.


Remember, two alcoholic beverages for the optimal shine.
Flying around and using my Netherwing Drake (Drake Cam) can help with these aerial top-down shots. Useful for cartography.

I didn’t understand the science behind this photography technique at the time, but the “Rule of Thirds” is a composition guideline in photography, design, and art that suggests dividing an image into nine equal parts by two horizontal and two vertical lines. It advises placing key elements of the image along these lines or at their intersections to create a more balanced and engaging composition, rather than centering the subject.
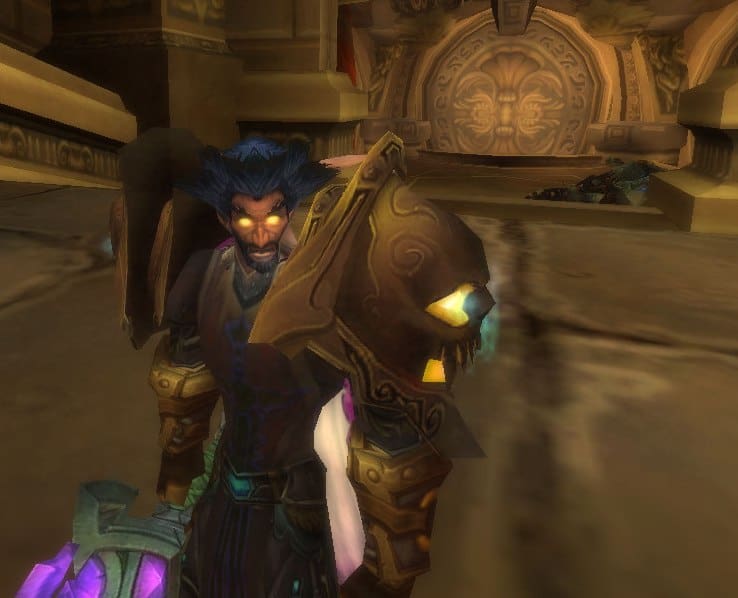
Keeping the central character off the center can be helpful for dynamic action.


Dialogue shots help conduct the story like a serialized graphic novel if you can capture personalized chat bubbles.


One of the most tragic quests in WotLK, in which you play Arthas and betray your own men.


The Drakkensryd is one of my most favorite quests in the game.


This NPC’s facial expression still cracks me up.
Hunter shots have bleed effects too.
Vikstone used his trusty Stormsaber since Vanilla.

Aerial shot from the Netherdrake cam.
The Netherdrake cam allows you to get up close while in the air.


This was a trickier shot in the Storm Peaks. Use Num Lock while flying downwards and swivel the frame with the left mouse button to frame the entrance.

This is what happens to these guys if you don’t kill the wyrms with the eagle.


The Battle for the Undercity – Vikstone about to be swallowed in the Undercity, in one of the greatest quests in the game (part of the Wrathgate chain).
I couldn’t resist.


If you miss… of course, there’s that critical hit.


Vikstone comes across something peculiar in Sholazar Basin, one of many easter eggs.










