Quest Giver: Gymer — Thrym’s End, Zul’Drak [19, 56]
Objective: While riding Gymer, destroy 100 Scourge and kill Algar the Chosen, Prince Navarius, and Thrym. Report to Crusader MacKellar at Crusader Forward Camp.
Quick Facts
Before You Start
Talk to Gymer and choose “I’m ready, Gymer. Let’s go!” to mount on his head. You’ll enter a phased version of the zone with different mobs. Read the ability descriptions before engaging.
Increase your camera distance first. The default max zoom can’t handle Gymer’s size, and poor visibility is the #1 complaint about this quest. Try zooming all the way out, or alternatively, zoom all the way in to first-person view so you can see past Gymer’s body.
Gymer’s Abilities
| # |
Ability |
What it Does |
Usage |
| 1 |
Gymer’s Smash |
AoE damage to all enemies within 12 yards |
Your primary damage ability. Spam this. |
| 2 |
Gymer’s Roar |
Cone knockback in front of Gymer |
Use to clear swarms of trash. Costs 50 energy. |
| 3 |
Gymer’s Grab |
Pick up a targeted Storm Cloud or enemy |
Critical for healing. Target a Storm Cloud and press 3 to pick it up. |
| 4 |
Gymer’s Throw |
Throw whatever is in Gymer’s hand |
Throw grabbed enemies for AoE explosion damage. Throw unwanted Storm Clouds. |
CRITICAL: Use auto-attack! Right-click your target or press T. Gymer’s melee hits for 8-9k and many players fail this quest because they only use abilities without auto-attacking.
Storm Clouds (How to Heal)
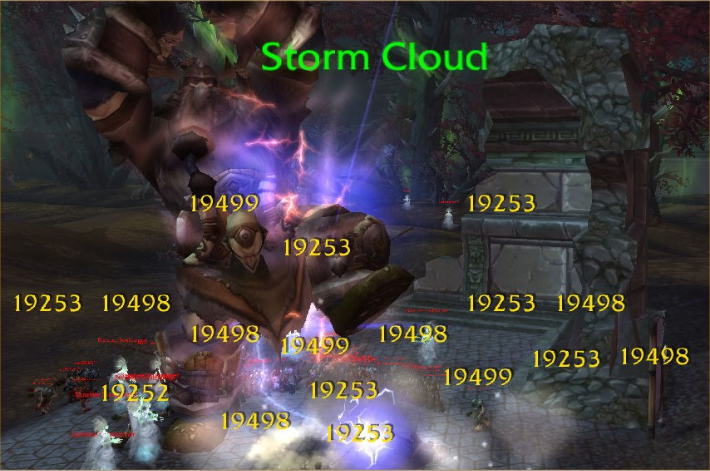
Storm Clouds are small blue-white glowing spheres floating near ground level, often near green glyphs on the ground. They’re friendly units, so they won’t have hostile nameplates.
- Target the Storm Cloud, then press 3 (Grab) to pick it up.
- If it heals: You’ll see beams of light on Gymer and his health rising. This is a heal-over-time, not instant. Keep fighting while it heals you.
- If it doesn’t heal: Some Storm Clouds are bugged or are a different type (attack power buff instead of heal). If nothing happens after a few seconds, press 4 (Throw) to get rid of it and find another.
- Common mistake: If you have a Vargul in your hand, you can’t grab a Storm Cloud. Press 4 to throw the Vargul first. Also use Roar (2) before grabbing to knock enemies away so you don’t accidentally grab one instead of the cloud.
Kill Order and Strategy
1. Algar the Chosen — [30, 45] Head northeast toward the Reliquary of Pain. Algar flies around on a skeletal dragon. He’ll aggro and land when you get close. Straightforward fight. Spam Smash (1), auto-attack, and use Roar (2) to manage trash adds. Clear nearby Scourge before engaging so you’re not fighting 50 things at once.
2. Prince Navarius — [32, 64] Head south. Navarius is a human-sized NPC inside a purple bubble, near the great stairs leading up to the Argent Stand. He’s tiny from Gymer’s perspective, so look for the purple glow.
- Soul Deflection: Navarius casts a damage reflection spell. When you see yellow text on screen or a channeled cast under his nameplate, stop all DPS immediately. Continuing to attack during this will reflect massive damage back onto Gymer (players report hits of 75k+). Wait for it to end, then resume.
- Stay close. Navarius can reset if you move too far away to find a Storm Cloud.
- Before engaging, note the locations of nearby Storm Clouds. There’s typically one behind/near where Navarius stands.
3. Thrym — spawns at Navarius’s location Thrym only appears after Navarius dies. He yells “MASTER! NO!” and then “THRYM CRUSH!” before jumping down from the wall above where Navarius was standing.
- Heal between bosses. You have a brief window after Navarius dies and before Thrym reaches you. Grab the nearest Storm Cloud.
- Do not run far. Thrym despawns if you leave his area, and you’ll have to kill Navarius again to re-spawn him.
- There are usually 2-3 Storm Cloud spawns in the Navarius/Thrym fight area. Memorize their locations before engaging Navarius.
- Thrym hits hard but is a straightforward tank-and-spank. Spam Smash, auto-attack, grab Storm Clouds as needed.
The 100 Scourge kills will accumulate naturally while traveling between bosses and during fights. Don’t go out of your way for them.
If Gymer Dies You won’t die yourself. Dismount safely and go back to Gymer’s cage at [19, 56]. Talk to him to remount and continue. Your progress on boss kills is saved across deaths.
After completing all objectives, dismount somewhere safe (avoid Thrym’s patrol path) and return to Crusader MacKellar at the Crusader Forward Camp [25, 64] to turn in.
Known Issues
- Camera: Gymer’s size makes visibility terrible. First-person view or maximum zoom-out both work. Mouse-steering helps.
- Terrain: Gymer gets stuck on small rocks, fence posts, fallen trees, and debris constantly. Stick to roads when possible. Jump to clear small obstacles.
- Storm Cloud bugs: Some Storm Clouds don’t heal. If one isn’t working, throw it and find another.
- Other players: During busy hours, other players doing the quest can tag your boss spawns. If this is an issue, try off-peak hours.
- Stuck in combat: Some players report being stuck in combat permanently after completing the quest. Hearthing out or logging off/on resolves this.
Lore Context
When the Scourge presses you low on health, Gymer yells something like “Gymer needs Storm Cloud badly!”
This is a reference to the classic arcade game Gauntlet, which would announce “Warrior needs food badly!” when a player was low on health.
Prince Navarius is a San’layn (darkfallen) warlord. The San’layn are undead blood elves who serve the Lich King. They appear again as antagonists in Battle for Azeroth.
Thrym was stitched together from harvested storm giant corpses by Navarius. He’s one of the tallest creatures in the entire game. His name comes from the frost giant Thrym from Norse mythology, famous for stealing Thor’s hammer Mjolnir.
Gymer’s name derives from Ymir, the primordial frost giant in Norse mythology. Gymer shouts “Taste Gymer’s size 600!” while fighting, referring to his shoe size. He also roars “SUCH POWER! LIGHTNING GUIDE MY FURY!” when absorbing Storm Clouds.
The entire quest phases you into a separate instance. Other players doing the quest share your phase (which is why boss tagging conflicts happen), but the Scourge you see aren’t the same mobs on the “normal” ground.
Dismount somewhere clear when done, since the Scourge will despawn once you exit the phase.
Explore Zul’Drak’s hidden easter eggs, lore mysteries, and connections across Warcraft history in Vikstone’s Zul’Drak Chronicles, along with the complete quest storyline.




 Vikstone's War Journal







