Expeditions, war stories & culture

War stories, articles & game guides

Gamer

Tribute

2026

Expeditions,

War Stories &

Culture

Share

Hour of the Worg

Quest 2 of 2 in the Arugal Chain (Finale)
Group Quest
Alliance • Grizzly Hills • Level 75 • Bloodmoon Isle
Travel to Bloodmoon Isle [82, 30] and kill Selas, Varlam, Goremaw, and the Shade of Arugal. Suggested 3 players.
Kill all 3 lieutenants BEFORE Arugal or the turn-in breaks. Order: Selas [85, 28] (worgen, right side), Varlam [85, 23] (mounted, left side), Goremaw [86, 27] (worg at tower base, go right around entrance). Dispel Goremaw's bite before 3 stacks or you transform. Arugal has 4 phases: Shadow Bolt spam, add wave, mind control, 9-add swarm where Sasha arrives. Use the staircase for LoS. Pet classes dismiss pets before Phase 3 MC or encounter resets. Turn in to Sasha at the tower top immediately.
Vikstone's Classic Expedition
Four sailed for Bloodmoon Isle at dusk: Biggiet and Toity, two mages whose fire would serve well, Ogamiitto the rogue, and Vikstone. No healer. What waited in Shadowfang Tower was an archmage who had already died once and wasn't planning on staying dead again.

“It is time, then, Vikstone. Arugal must be defeated. Get a couple of people you can trust and head for Bloodmoon Isle. It’s just off the coast, east of here. We’ll hit them fast. Take out Arugal’s lieutenants — I’ll catch up with you when it’s time to take out the monster himself.”

-Sasha

Objective

LEVEL

75

Requires level

73

Loremaster

Grizzly Hills

Start

END

Sasha at the White Pine Trading Post wants you to go to Bloodmoon Isle and slay Selas, Varlam, Goremaw and the Shade of Arugal.


Suggested players: 3


Defeat the Lieutenants:
Selas (85.6, 27.5): Located in a camp on the way up to the tower.
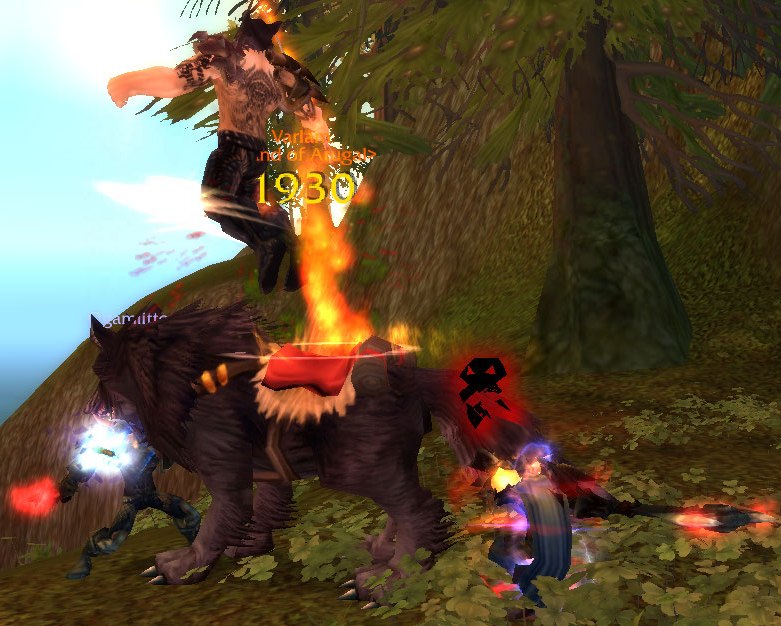
Varlam (85.0, 23.4): Found at another camp higher up the path. He is mounted on a worg.
Goremaw (86.7, 27.2): Housed in a stable near the tower. Clear the non-elite mobs nearby before engaging.
2. Face the Shade of Arugal (87.6, 26.4):
Found at the top of the tower, Arugal is a multi-phase boss encounter with challenging mechanics. Be prepared for shadow bolts, adds, and his signature Mind Control ability.
Defeat the Lieutenants:
Selas (85.6, 27.5): Located in a camp on the way up to the tower.
Varlam (85.0, 23.4): Found at another camp higher up the path. He is mounted on a worg.
Goremaw (86.7, 27.2): Housed in a stable near the tower. Clear the non-elite mobs nearby before engaging.
Face the Shade of Arugal (87.6, 26.4): Found at the top of the tower, Arugal is a multi-phase boss encounter with challenging mechanics. Be prepared for shadow bolts, adds, and his signature Mind Control ability.


Reward

You will also receive:

17 Gold

70 Silver

Upon completion of this quest you will gain:

20,950 experience
250 reputation with Valiance Expedition

Walkthrough


Quest Giver: Sasha — White Pine Trading Post, Grizzly Hills [57, 41] (also available at Duskhowl Den after completing A Sister’s Pledge)

Objective: Travel to Bloodmoon Isle and slay Selas, Varlam, Goremaw, and the Shade of Arugal.


Quick Facts

  • Quest Type: Group (Suggested 3 players)
  • Location: Bloodmoon Isle [82, 30], off the eastern coast of Grizzly Hills
  • Chain Position: Final quest in the Wolfcult/Sasha storyline


Walkthrough

Getting to Bloodmoon Isle

Bloodmoon Isle is a small island off the eastern coast of Grizzly Hills, roughly around [82, 30]. Fly or swim east from the mainland. When you land, follow the path uphill toward Shadowfang Tower [86, 26], which dominates the island’s summit. The tower is built in the same style as Shadowfang Keep, and that’s no coincidence.


Kill the Three Lieutenants

All three lieutenants are level 75 elites. They can be stunned but are immune to snares. Kill all three BEFORE engaging the Shade of Arugal. If you kill Arugal first, Sasha will spawn and despawn before you can finish the other objectives, forcing you to return to White Pine Trading Post to turn in.

  • Selas [85, 28] — A large worgen in a camp to your right as you head up the path. He has ~63.8k HP. Abilities include Axe Volley (ranged attack) and Killing Rage (doubles his attack speed for 6 seconds). He has a couple of adds in his camp, so be ready to handle them. Despite his enrage, he’s a straightforward fight. He’s slow, and ranged classes can kite him easily.
  • Varlam [85, 23] — A Wolfcult member mounted on a worg, found at a second camp higher up the path to your left. He has ~53.2k HP. Uses Cleave and Mortal Strike (reduces healing by 50% for 5 seconds). He may have adds around him as well. This is a tank-and-spank fight.
  • Goremaw [86, 27] — A massive worg stabled at the base of Shadowfang Tower. To find the stables, go around the right side of the tower entrance rather than going inside. He has ~53.2k HP.
    • Important mechanic: His Infected Worgen Bite is a stacking Nature damage DoT. If it stacks to 3, you transform into a worgen and are silenced for one minute. Dispel the disease before it stacks. Carnivorous Bite is an additional bleed DoT. Goremaw hits harder than the other two lieutenants, so he’s worth saving cooldowns for if soloing. Clear the non-elite worgs around the stables before pulling him.


Face the Shade of Arugal

The Shade of Arugal (~106k HP) waits at the top of Shadowfang Tower, surrounded by non-elite Bloodmoon Cultists. You can pull the cultists without aggroing Arugal, but they respawn quickly (~20 seconds), so don’t dawdle. Clear one side and engage.

The fight has four phases, impressive for a non-instanced boss:

Phase 1 (100% to ~75% HP): Arugal stands still and chain-casts Shadow Bolt. The bolts hit for roughly 1,000-1,200 damage and cannot be interrupted, but they can be line-of-sighted and spell-reflected. Pull him to the staircase to use the walls for LoS when you need to heal or regenerate.

Phase 2 (~75% HP): Arugal uses Phase Out, becoming invulnerable and immobile for up to 20 seconds. He summons 3 Bloodmoon Servants (non-elite worgen). Kill all three, then continue DPSing Arugal when his shield drops.

Phase 3 (~50% HP): Arugal uses Phase Out again, then casts Worgen’s Command on a party member. This is a mind control effect lasting 20 seconds or until the target is brought below 35% HP.

The mind-controlled player receives a buff called Worgen’s Blood that regenerates 2% HP and 20 resource (rage/mana/runic power) per second for 5 minutes. DPS the controlled player down to break the MC, heal them up, then resume the fight.

Solo note: If you’re alone, MC behavior is inconsistent. It may skip entirely or fire and reset the encounter, especially if you have an active pet (including Blood Worms, totems, or Water Elementals). Pet classes attempting to solo should dismiss pets before this phase.

Phase 4 (~25% HP): Arugal goes invulnerable one final time and summons roughly 9 Bloodmoon Servants. Sasha arrives to help, joining the fight and one-shotting some of the adds. AoE the servants down, then finish off Arugal.


After the Kill

Sasha spawns at the top of the tower after Arugal dies. Turn in the quest immediately, as the scene resets quickly. If you miss her, head back to White Pine Trading Post [57, 41] to turn in there instead.


Solo Strategy (WotLK Classic)

Despite the “Group (3)” tag, this quest is widely soloable in WotLK by level 75-80 characters with healing or mitigation capabilities. In WotLK Classic, better gear availability makes it even more accessible. Key principles:

  • Use the staircase. The stairs inside Shadowfang Tower are your best friend. Pull Arugal to the staircase and use corners to LoS his Shadow Bolts when you need to heal.
  • Phase 2 skip trick: If you’re standing at the bottom of the staircase when Arugal summons his 3 adds in Phase 2, the adds may not aggro you. Wait for them to despawn, and Arugal will come back down to you.
  • Pet classes, beware Phase 3. Blood Worms, summoned ghouls, Water Elementals, and likely totems can cause Arugal to MC you and then reset the encounter when there’s nothing to keep combat going. Dismiss or avoid summoning pets before 50% HP. Death Knights may need to avoid Heart Strike/Blood Strike entirely to prevent Blood Worm spawns.
  • Phase 4 is the hard part solo. You cannot use the “wait for adds to despawn” trick here because Sasha runs in and aggros them. Save your major cooldowns (Icebound Fortitude, Berserk, Divine Shield, Feral Spirits, Fire Elemental, etc.) for this phase.
  • Worgen’s Blood buff is your friend. If you DO get mind-controlled and survive, the Worgen’s Blood buff (2% HP/sec, 20 resource/sec for 5 minutes) makes the rest of the fight dramatically easier.


Efficiency Tips

  • Kill the three lieutenants on the way up in order: Selas first (right side camp), Varlam second (left side camp higher up), then Goremaw at the tower base (go right around the tower entrance to the stables). This creates a natural path to Arugal at the top.
  • Bring health potions and bandages even if you’re in a group. The Phase 4 add swarm is the most common wipe point.
  • If you die and run back, Arugal will likely have reset to full HP. Plan accordingly.


Lore Context

This is the climactic payoff for the entire Wolfcult storyline, and Blizzard gave it a fight to match. The Shade of Arugal’s 4-phase encounter on an open-world island is one of the most mechanically complex non-instanced boss fights in WotLK.

The tower itself, Shadowfang Tower, is deliberately designed as a miniature Shadowfang Keep right down to the worn stone and rotting banners. Even Goremaw parallels Fenrus the Devourer from the original dungeon, stabled in the same position at the tower’s base.

Sasha keeps her pledge from A Sister’s Pledge. She told you at Duskhowl Den that if you helped rescue Anya, she’d fight at your side against Arugal. She arrives in Phase 4 when the odds are worst and helps you finish the job. Her completion text is telling: “We got him good… but not good enough.”

She knows this isn’t a permanent death. Arugal was already resurrected once by the San’layn. Killing his shade disperses him from the Grizzly Hills, but doesn’t destroy him entirely.

The quest name itself is likely a reference to the 1968 Ingmar Bergman film Hour of the Wolf, which draws on the old European superstition about the hour between night and dawn when evil spirits are at their strongest and wolves lurk outside.


Cross-Expansion Connections

  • Cataclysm: Shadowfang Keep was reworked as a level 18-21 dungeon (and Heroic level 85). Lord Godfrey replaced Arugal as the final boss, but Arugal’s ghost appears as a dungeon encounter in the revamped version, making his haunting of that fortress a recurring theme across expansions.
  • Post-Shadowlands: According to Exploring Azeroth: Northrend, the Bronzebeard brothers visited Bloodmoon Isle years later. They noted that Shadowfang Tower still stands and that while Arugal is dead, the Wolfcult lingers. The island’s corruption was never fully cleansed.
  • Legion: Sasha herself appears as Initiate Sasha at Trueshot Lodge, having joined the Unseen Path (the Hunter class order hall). The trapper who lost everything to the Wolfcult found a new purpose as a hunter of greater evils.
  • Elder Scrolls III: Morrowind Easter Egg: There is a reference to The Elder Scrolls III: Morrowind expansion Bloodmoon, which also featured an island and werewolf transformations. 


Explore Grizzly Hills’ hidden easter eggs, lore mysteries, and connections across Warcraft history in Vikstone’s Grizzly Hills Chronicles, along with the complete quest storyline.

Upon completion of this quest you will gain:
5,250 experience
250 reputation with Valiance Expedition

Warrior IconVikstone's War Journal

“It is time,” Sasha said. “Arugal must be defeated. Get a couple of people you can trust and head for Bloodmoon Isle. Take out his lieutenants. I’ll catch up when it’s time to take out the monster himself.”

Vikstone Portrait Act 2
Illustrated by Christian DiBari and Simon Gough.

Arugal, the mad archmage who unleashed the worgen curse upon the world. Killed once at Shadowfang Keep. Raised again by the Lich King’s San’layn to spread his plague anew.

We sailed at dusk. Four of us: Biggiet and Toity, two mages whose fire would serve us well against what waited on that island. Ogamiitto, a night elf rogue who moved like his own shadow. And me.

No healer. We’d make do, or we wouldn’t.

Bloodmoon Isle broke through the mist ahead, and the howling started before we made landfall.

Varlam found us first, riding his massive worg through the trees with a cultist’s fervor. Varlam swung from the saddle, cleaving at us while his worg lunged for our flanks. Ogamiitto materialized behind the rider and opened his throat before the rest of us had finished with the worg.

Selas came next. A worgen, once human. He fought like what he was: an animal. Biggiet and Toity bracketed him with fire while I held him in place.

Goremaw was the worst. Enormous and patient. He stalked us through the underbrush before exploding from the shadows, jaws snapping for throats. Ogamiitto caught the worst of it, the beast’s teeth closing on his arm before he twisted free. We gave ground, regrouped, and brought the creature down through sheer attrition.

Then Shadowfang Tower. And Arugal himself.

The Shade waited in the tower’s heart in spectral form. Shadow bolts tore through the air the moment we crossed the threshold. Toity and Biggiet answered with fire, and for a moment it looked like numbers would carry us.

Then Arugal vanished. Simply ceased to be, wrapped in some spectral shield none of us could touch. Bloodmoon Servants poured from the walls. The mages burned them down, arcane fire splashing off the stonework, and when the last servant fell, Arugal reappeared, already casting.

He vanished again at half strength. This time, no servants.

This time, Ogamiitto stopped mid-strike. Turned. His daggers came up, and the person behind them was gone.

“Don’t kill him!” I caught the rogue’s first slash on my shield. Toity hesitated, a spell half-formed in her hands. Biggiet didn’t hesitate. He hit Ogamiitto with something blunt and cold, enough to rattle, not enough to ruin. The rogue staggered. I drove my shoulder into his chest, pinned him against the wall. He thrashed, inhuman strength behind those empty eyes.

Then the light came back. Ogamiitto blinked, looked at the dagger pressed against my gorget, and went very still.

“Was that me?” he asked.

“Later,” I said.

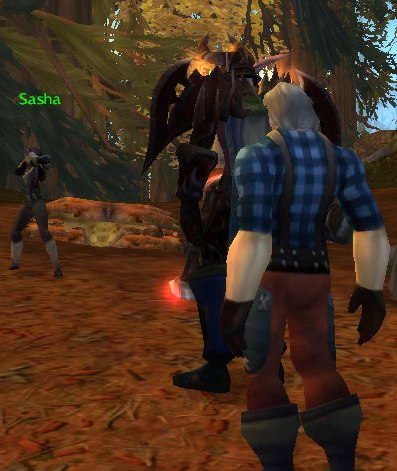
Arugal materialized for the last time at quarter strength, and nine servants flooded the tower. Biggiet and Toity unleashed everything they had. Fire roared through the chamber, and at the edge of it, Sasha arrived. Rifle blazing, keeping her promise.

Arugal’s form shattered, but something slipped away in the chaos, laughing as it fled.

“We got him good,” Sasha said afterward. “But not good enough. One thing’s for sure… we won’t be seeing him around these parts any longer.”

Bloodmoon Isle fell silent and the wolfcult was broken. Sasha’s father avenged, her sister safe.

Ogamiitto sat apart from the rest of us on the boat back, flexing the hand that had held the dagger to my throat. He hadn’t spoken since.

Arugal had escaped true death once before. I suspected we hadn’t seen the last of him.


Bloodmoon Isle fell silent. Sasha kept her promise, and something looking like Arugal slipped away into less than death. Grizzly Hills still has work left, starting with a fanfare in Dun-da-Dun-tah!

Share

Share this:

The Making of the Guide

Solo PvP Guide

The Guide to SWGEmu

>